We work with photographers all across the land on various design and print projects over the course of this year. When it comes printing for photographers, we’ll tell no lie, you’re a picky bunch. But with that said, so are we and we believe that’s why we all get along so well. As a printer it’s our job understand how your photography should look on a roll up banner and not just print the files supplied without care or consideration. This is why we’ve become the photographers choice of printer in Belfast.
There’s a couple of common points we address with photographers regarding the design and print of roller banners. Today we’re outlining our tips on how to create the perfect files for print. It’s not hard, but by following the steps below, we’re confident that the majority of issues that could present themselves are addressed before we even see your artwork.
As always we’re always on hand with our amazing customer service and artwork teams to help you along the way. If you need advice or want us to check your files for print-readiness, please just get in touch and we’ll come back to you right away.
Here’s our top 5 tips for photographers designing a roll up banner.
Think about the design
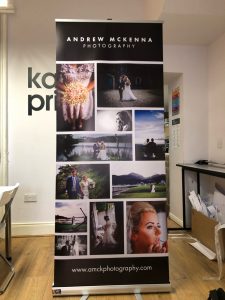
Just like you plan in advance with your photoshoots, a roll up banner needs careful thought and consideration before putting mouse to your design application. Due to the very visual nature of your business, we suggest you either use one feature image or a tiled array of multiple images.
Being designers ourselves, we understand the wish to put all our work on display, however this can detract from the overall design and so we recommend a huge single image. Couple this with your logo, a brief sentence about your services, as well as your contact details and you have the elements of a roll up banner ready to go.
Bleed
Even to this day, bleed is the printing term that mystifies most people, not just photographers. In short, bleed is the extra area we need you to add to your designs to allow us to trim it to the exact finished size. On almost all print items the bleed should be set at 3mm. You can do this in indesign or illustrator when setting up your artboards. Roller banners are a little different in that we need an extra area of bleed on the bottom of the design to allow this to be fed into the roll up banner mechanism. So 3mm on the top, right and left. 100mm bleed on the bottom.
If indesign or illustrator does not allow such a large bleed, simply make the artboard 100mm taller and set a guide 100mm from the bottom to show you where the bleed was.
Margin
Similar to bleed, margin is the space you leave on the inside of the graphic away from the edges. While it serves a very specific purpose of keeping critical information away from the cutting area, it also serves as a great design feature. Keep all text and critical images a fair bit away from the edges. It’ll make your design much nicer overall.
RGB imagery
You shoot in RGB, we print in CMYK. These colour spectrums don’t always like to get along and the conversion from RGB to CMYK will often (always) darken the imagery somewhat. Our machines are calibrated to give the best average conversion automatically, but this is an average and we always recommend photographers do the conversion before using within their designs.
High resolution images
We don’t think we even need to mention this….
With all the wedding shows and exhibitions that happen over the course of the year, it’s always prudent to use the right printer for your roll up banners, leaflets and other printing. We’re always here to help and to make sure you get the best from all your marketing and sales materials!
 We work with photographers all across the land on various design and print projects over the course of this year. When it comes printing for photographers, we’ll tell no lie, you’re a picky bunch. But with that said, so are we and we believe that’s why we all get along so well. As a printer it’s our job understand how your photography should look on a roll up banner and not just print the files supplied without care or consideration. This is why we’ve become the photographers choice of printer in Belfast.
There’s a couple of common points we address with photographers regarding the design and print of roller banners. Today we’re outlining our tips on how to create the perfect files for print. It’s not hard, but by following the steps below, we’re confident that the majority of issues that could present themselves are addressed before we even see your artwork.
As always we’re always on hand with our amazing customer service and artwork teams to help you along the way. If you need advice or want us to check your files for print-readiness, please just get in touch and we’ll come back to you right away.
We work with photographers all across the land on various design and print projects over the course of this year. When it comes printing for photographers, we’ll tell no lie, you’re a picky bunch. But with that said, so are we and we believe that’s why we all get along so well. As a printer it’s our job understand how your photography should look on a roll up banner and not just print the files supplied without care or consideration. This is why we’ve become the photographers choice of printer in Belfast.
There’s a couple of common points we address with photographers regarding the design and print of roller banners. Today we’re outlining our tips on how to create the perfect files for print. It’s not hard, but by following the steps below, we’re confident that the majority of issues that could present themselves are addressed before we even see your artwork.
As always we’re always on hand with our amazing customer service and artwork teams to help you along the way. If you need advice or want us to check your files for print-readiness, please just get in touch and we’ll come back to you right away.